References for “Understanding Risk & Uncertainty” presentation
These references are from the practical statistics presentation given at several different events, including a CSA meeting and several science fiction conventions.
- Doucleff M. No, Seriously, How Contagious Is Ebola? NPR [Internet]. 2014 Oct 2 [cited 2022 Apr 12]; Available from: https://www.npr.org/sections/health-shots/2014/10/02/352983774/no-seriously-how-contagious-is-ebola
- Huff D. How to lie with statistics. New York: Norton; 1993. 144 p.
- Jablow M. Cancer-Drug Ads vs Cancer-Drug reality. New York Times [Internet]. 2016 Aug 9; Available from: https://www.nytimes.com/2016/08/09/opinion/cancer-drug-ads-vs-cancer-drug-reality.html
- Jones GE. How to lie with charts: fourth edition. 4th edition. Santa Monica, CA: LaPuerta Books and Media; 2018. ISBN-13 : 978-0996543866
- Kliff S, Bhatia A. When They Warn of Rare Disorders, These Prenatal Tests Are Usually Wrong. The New York Times [Internet]. 2022 Jan 1 [cited 2022 Apr 12]; Available from: https://www.nytimes.com/2022/01/01/upshot/pregnancy-birth-genetic-testing.html
- Mina MJ, Parker R, Larremore DB. Rethinking Covid-19 Test Sensitivity — A Strategy for Containment. N Engl J Med. 2020 Nov 26;383(22):e120. DOI: 10.1056/NEJMp2025631
- Paik S, Shak S, Tang G, Kim C, Baker J, Cronin M, et al. A Multigene Assay to Predict Recurrence of Tamoxifen-Treated, Node-Negative Breast Cancer. New England Journal of Medicine. 2004 Dec 30;351(27):2817–26.
- Yildirim G, Gungorduk K, Guven HZ, Aslan H, Celikkol Ö, Sudolmus S, et al. When should we perform prophylactic antibiotics in elective cesarean cases? Arch Gynecol Obstet. 2009 Jul;280(1):13–8.
- Why Pretest and Posttest Probability Matter in the Time of COVID-19 [Internet]. ASM.org. [cited 2022 Apr 12]. Available from: https://asm.org/Articles/2020/June/Why-Pretest-and-Posttest-Probability-Matter-in-the
- http://wbakerrobinson.shinyapps.io/Paired_T_test_shiny/
References for “Leadership & Management” presentation
These references are for the presentation first given at a CSA meeting in 2019.
American Society of Anesthesiologists Committee on Occupational Health. Guidelines for Surgical Attire [Internet]. 2019 [cited 2022 Nov 4]. Available from: https://www.asahq.org/standards-and-guidelines/guidelines-for-surgical-attire
American Society of Anesthesiologists Committee on Practice Parameters. Guidelines for NMT and Reversal — approved by House of Delegates 10/27/2022, but not posted as of 11/8/2022.
Ash J. Organizational Factors that Influence Information Technology Diffusion in Academic Health Sciences Centers. Journal of the American Medical Informatics Association. 1997 Mar 1;4(2):102–11. https://doi.org/10.1136/jamia.1997.0040102
Ash JS, Stavri PZ, Dykstra R, Fournier L. Implementing computerized physician order entry: the importance of special people. Int J Med Inform. 2003 Mar;69(2–3):235–50. https://doi.org/10.1016/s1386-5056(02)00107-7
Bradley AS, Burgart AM. Write-Ups, Retribution, and ‘DARVO.’ ASA Monitor. 2022 Sep 1;86(9):25–6. https://doi.org/10.1097/01.ASM.0000874252.49884.49
Chi J. Skull Cap or Bouffant Cap Why It Matters – Anesthesiology News [Internet]. Anesthesiology News. 2019 [cited 2021 Dec 31]. Available from: https://www.anesthesiologynews.com/Commentary/Article/04-19/Skull-Cap-or-Bouffant-Cap-Why-It-Matters/54577
Elmously A, Gray KD, Michelassi F, Afaneh C, Kluger MD, Salemi A, et al. Operating Room Attire Policy and Healthcare Cost: Favoring Evidence over Action for Prevention of Surgical Site Infections. Journal of the American College of Surgeons. 2019 Jan;228(1):98–106. https://doi.org/10.1016/j.jamcollsurg.2018.06.010
Fujita T. Evidence-Based Surgical Attire. Journal of the American College of Surgeons. 2018 Oct;227(4):475–6. https://doi.org/10.1016/j.jamcollsurg.2018.07.005
Fuller J, Kerr W. The Great Resignation Didn’t Start with the Pandemic. Harvard Business Review [Internet]. 2022 Mar 23 [cited 2022 Mar 28]; Available from: https://hbr.org/2022/03/the-great-resignation-didnt-start-with-the-pandemic
Gardner R. Davies keynote lecture. Proceedings of the Computer-based Patient Record Institute Conference; 1998; Washington, DC.
Hidalgo J. The Four Dangers of Intuitive Leadership [Internet]. Jay Hidalgo. 2021 [cited 2022 Nov 7]. Available from: https://jayhidalgo.com/dangers-intuitive-leadership/
Jordan J, Wade M, Yokoi T. Finding the Right Balance — and Flexibility — in Your Leadership Style. Harvard Business Review [Internet]. 2022 Jan 11 [cited 2022 Nov 7]; Available from: https://hbr.org/2022/01/finding-the-right-balance-and-flexibility-in-your-leadership-style
Kahneman D. Thinking, Fast and Slow. Farrar, Straus and Giroux; 2011.
Kothari SN, Anderson MJ, Borgert AJ, Kallies KJ, Kowalski TJ. Bouffant vs Skull Cap and Impact on Surgical Site Infection: Does Operating Room Headwear Really Matter? Journal of the American College of Surgeons. 2018 Aug 1;227(2):198–202. https://doi.org/10.1016/j.jamcollsurg.2018.04.029
Looi M. Summary of Kahneman’s “Thinking Fast and Slow” [Internet]. Medium. 2020 [cited 2022 Nov 4]. Available from: https://marklooi.medium.com/summary-of-kahnemans-thinking-fast-and-slow-3d1c2ea0e6a
Lorenzi NM, Riley RT. Managing Change: An Overview. Journal of the American Medical Informatics Association. 2000 Mar 1;7(2):116–24. https://doi.org/10.1136/jamia.2000.0070116
Robbins SP, Judge TA. Organizational Behavior. 17th ed. Pearson Education; 2018.
Silver I, Shaw A. When Staying Neutral Backfires. Harvard Business Review [Internet]. 2022 Aug 24 [cited 2022 Sep 1]; Available from: https://hbr.org/2022/08/when-staying-neutral-backfires
Tamboli A. When It Comes to Promotions, It’s About Who Knows You … Not Who You Know. Harvard Business Review [Internet]. 2022 Sep 7 [cited 2022 Nov 4]; Available from: https://hbr.org/2022/09/when-it-comes-to-promotions-its-about-who-knows-you-not-who-you-know
Trimmer PC, Paul ES, Mendl MT, McNamara JM, Houston AI. On the Evolution and Optimality of Mood States. Behavioral Sciences. 2013 Sep;3(3):501–21.
Zenger J, Folkman J. Quiet Quitting Is About Bad Bosses, Not Bad Employees. Harvard Business Review [Internet]. 2022 Aug 31 [cited 2022 Nov 4]; Available from: https://hbr.org/2022/08/quiet-quitting-is-about-bad-bosses-not-bad-employees
Exterior Paint
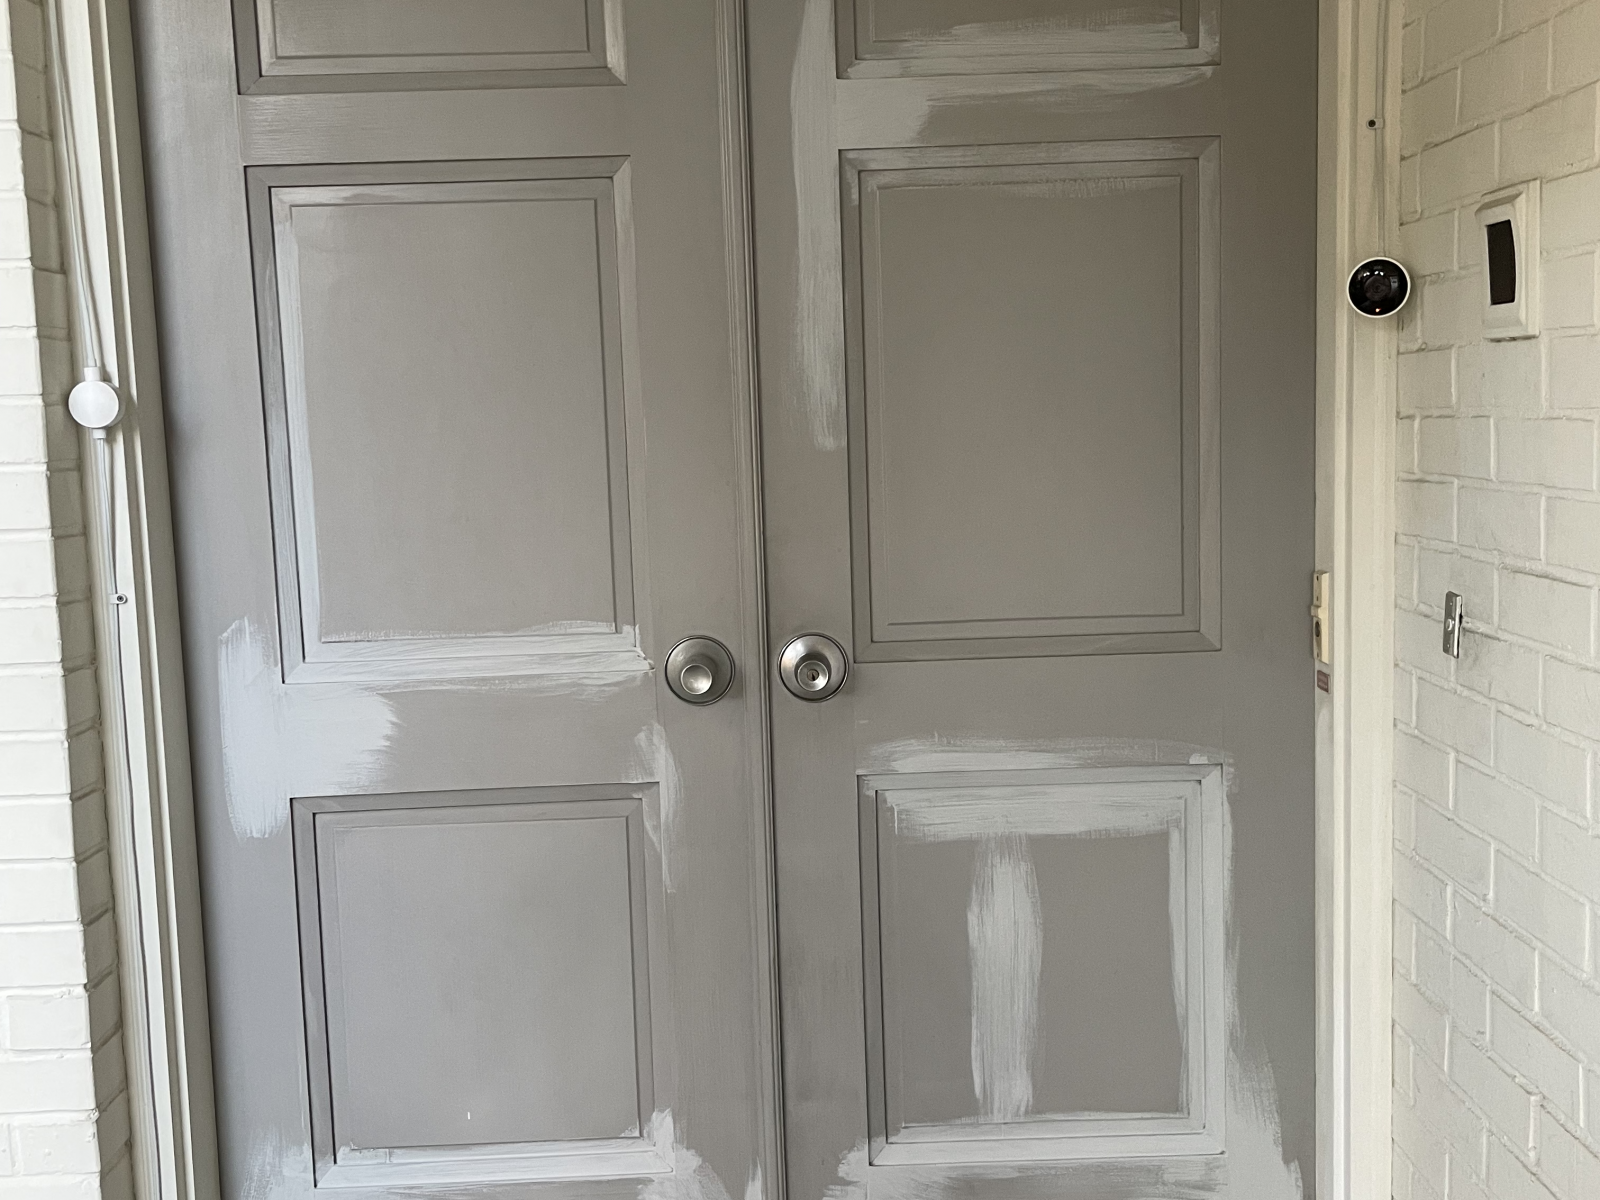
The exterior of mom’s house hadn’t been painted in at least 15 years. The exterior of our house was painted during the remodel, 15 years ago. Both needed some work. I contacted our general contractor from the remodel, and we ultimately selected Lance Cole Painting. Lance came out, took a look at the property, figured out how much prep work it would need (a lot), and then started at the end of August.
Power washing came first. Sanding and repairing as necessary. Priming again. We didn’t start the actual paint job until the 4th day.
We are very happy with the work, and certainly recommend Lance and his team.


References for Biologics & Anesthesia
These are the references for a presentation about Biologics, Anesthesia, and Critical Care.
Agarwal K, Yousaf N, Morganstein D. Glucocorticoid use and complications following immune checkpoint inhibitor use in melanoma. Clin Med (Lond). 2020 Mar;20(2):163–8. https://www.ncbi.nlm.nih.gov/pmc/articles/PMC7081795/
Billmeier U, Dieterich W, Neurath MF, Atreya R. Molecular mechanism of action of anti-tumor necrosis factor antibodies in inflammatory bowel diseases. World Journal of Gastroenterology. 2016 Nov 14;22(42):9300–13. https://www.wjgnet.com/1007-9327/full/v22/i42/9300.htm
Brahmer JR, Lacchetti C, Schneider BJ, Atkins MB, Brassil KJ, Caterino JM, et al. Management of Immune-Related Adverse Events in Patients Treated With Immune Checkpoint Inhibitor Therapy: American Society of Clinical Oncology Clinical Practice Guideline. JCO. 2018 Jun 10;36(17):1714–68.
https://ascopubs.org/doi/10.1200/JCO.2017.77.6385
Chaar M, Kamta J, Ait-Oudhia S. Mechanisms, monitoring, and management of tyrosine kinase inhibitors-associated cardiovascular toxicities [Internet]. OncoTargets and Therapy. 2018 [cited 2021 Apr 25]. Available from: https://www.dovepress.com/mechanisms-monitoring-and-management-of-tyrosine-kinase-inhibitors-ass-peer-reviewed-fulltext-article-OTT
Chhabra N, Kennedy J. A Review of Cancer Immunotherapy Toxicity: Immune Checkpoint Inhibitors. J Med Toxicol [Internet]. 2021 Apr 7 [cited 2021 Apr 25]; https://doi.org/10.1007/s13181-021-00833-8
Crisci S, Di Francia R, Mele S, Vitale P, Ronga G, De Filippi R, et al. Overview of Targeted Drugs for Mature B-Cell Non-hodgkin Lymphomas. Frontiers in Oncology [Internet]. 2019 [cited 2022 May 13];9. Available from: https://www.frontiersin.org/article/10.3389/fonc.2019.00443
Das S, Ariizumi K, Cruz PD. T-CELL INHIBITORS: A BENCH-TO-BEDSIDE REVIEW. Dermatitis. 2012 Sep;23(5):195–202. https://www.ncbi.nlm.nih.gov/pmc/articles/PMC3485635/
Dumoulin DW, Visser S, Cornelissen R, van Gelder T, Vansteenkiste J, von der Thusen J, et al. Renal Toxicity From Pemetrexed and Pembrolizumab in the Era of Combination Therapy in Patients With Metastatic Nonsquamous Cell NSCLC. Journal of Thoracic Oncology. 2020 Sep 1;15(9):1472–83. https://www.sciencedirect.com/science/article/pii/S1556086420303361
Elias AW, Kasi PM, Stauffer JA, Thiel DD, Colibaseanu DT, Mody K, et al. The Feasibility and Safety of Surgery in Patients Receiving Immune Checkpoint Inhibitors: A Retrospective Study. Front Oncol [Internet]. 2017 Jun 12 [cited 2021 Apr 28];7. Available from: https://www.ncbi.nlm.nih.gov/pmc/articles/PMC5466999/
Fragulidis G, Pantiora E, Michalaki V, Kontis E, Primetis E, Vezakis A, et al. Immune-related intestinal pseudo-obstruction associated with nivolumab treatment in a lung cancer patient. J Oncol Pharm Pract. 2019 Mar;25(2):487–91.
Gutierrez C, McEvoy C, Munshi L, Stephens RS, Detsky ME, Nates JL, et al. Critical Care Management of Toxicities Associated With Targeted Agents and Immunotherapies for Cancer: Critical Care Medicine. 2020 Jan;48(1):10–21. http://journals.lww.com/00003246-202001000-00003
Helmink BA, Roland CL, Kiernan CM, Wargo JA. Toxicity of Immune Checkpoint Inhibitors: Considerations for the Surgeon. Ann Surg Oncol. 2020 May 1;27(5):1533–45. https://doi.org/10.1245/s10434-019-08183-0
Ibrahimi S, Machiorlatti M, Vesely SK, Malla M, Modhia F, Jones SA, et al. Incidence of Vascular Thromboembolic Events in Patients Receiving Immunotherapy: A Single Institution Experience. Blood. 2017 Dec 7;130(Supplement 1):4864–4864. https://doi.org/10.1182/blood.V130.Suppl_1.4864.4864
Joseph A, Simonaggio A, Stoclin A, Vieillard-Baron A, Geri G, Oudard S, et al. Immune-related adverse events: a retrospective look into the future of oncology in the intensive care unit. Annals of Intensive Care. 2020 Oct 16;10(1):143. https://doi.org/10.1186/s13613-020-00761-w
Kounis NG. Coronary Hypersensitivity Disorder: The Kounis Syndrome. Clinical Therapeutics. 2013 May 1;35(5):563–71. https://www.clinicaltherapeutics.com/article/S0149-2918(13)00078-7/abstract
Lemiale V, Meert A-P, Vincent F, Darmon M, Bauer PR, Van de Louw A, et al. Severe toxicity from checkpoint protein inhibitors: What intensive care physicians need to know? Ann Intensive Care. 2019 Feb 1;9(1):25. https://doi.org/10.1186/s13613-019-0487-x
Lewis AL, Chaft J, Girotra M, Fischer GW. Immune checkpoint inhibitors: a narrative review of considerations for the anaesthesiologist. British Journal of Anaesthesia. 2020 Mar 1;124(3):251–60. https://www.bjanaesthesia.org.uk/article/S0007-0912(19)30972-9/abstract
Liu MM, Reidy AB, Saatee S, Collard CD. Perioperative Steroid Management: Approaches Based on Current Evidence. Anesthesiology. 2017 Jul 1;127(1):166–72. https://doi.org/10.1097/ALN.0000000000001659
Longoria TC, Tewari KS. Evaluation of the pharmacokinetics and metabolism of pembrolizumab in the treatment of melanoma. Expert Opin Drug Metab Toxicol. 2016 Oct;12(10):1247–53. https://www.ncbi.nlm.nih.gov/pmc/articles/PMC5613934/
Martins F, Sofiya L, Sykiotis GP, Lamine F, Maillard M, Fraga M, et al. Adverse effects of immune-checkpoint inhibitors: epidemiology, management and surveillance. Nature Reviews Clinical Oncology. 2019 Sep;16(9):563–80. https://www.nature.com/articles/s41571-019-0218-0
Mays AC, Yarlagadda B, Achim V, Jackson R, Pipkorn P, Huang AT, et al. Examining the relationship of immunotherapy and wound complications following flap reconstruction in patients with head and neck cancer. Head & Neck. 2021;43(5):1509–20. https://onlinelibrary.wiley.com/doi/abs/10.1002/hed.26601
Puzanov I, Diab A, Abdallah K, Bingham CO, on behalf of the Society for Immunotherapy of Cancer Toxicity Management Working Group, Brogdon C, et al. Managing toxicities associated with immune checkpoint inhibitors: consensus recommendations from the Society for Immunotherapy of Cancer (SITC) Toxicity Management Working Group. j immunotherapy cancer. 2017 Dec;5(1):95. https://jitc.bmj.com/lookup/doi/10.1186/s40425-017-0300-z
Rezaieyazdi Z, Sahebari M, Khodashahi M. Preoperative Evaluation and Management of Patients Receiving Biologic Therapies. Arch Bone Jt Surg. 2019 May;7(3):220–8. https://www.ncbi.nlm.nih.gov/pmc/articles/PMC6578481/
Salinas C, Renner A, Rojas C, Samtani S, Burotto M. Primary Adrenal Insufficiency during Immune Checkpoint Inhibitor Treatment: Case Reports and Review of the Literature. CRO. 2020;13(2):621–6. https://www.karger.com/Article/FullText/507652
Simoneaux R, Shafer SL. Immune Checkpoint Inhibitor Therapies in Cancer Treatment. ASA Monitor. 2022 Sep;86(9):1-13.
https://doi.org/10.1097/01.ASM.0000874188.34355.5e
Spiers L, Coupe N, Payne M. Toxicities associated with checkpoint inhibitors—an overview. Rheumatology. 2019 Dec 1;58(Supplement_7):vii7–16. https://doi.org/10.1093/rheumatology/kez418
Wang DY, Salem J-E, Cohen JV, Chandra S, Menzer C, Ye F, et al. Fatal Toxic Effects Associated With Immune Checkpoint Inhibitors: A Systematic Review and Meta-analysis. JAMA Oncol. 2018 Dec 1;4(12):1721. http://oncology.jamanetwork.com/article.aspx?doi=10.1001/jamaoncol.2018.3923
Supportive Care and Treatment Related Issues [Internet]. ASCO. [cited 2021 Apr 28]. Available from: https://www.asco.org/research-guidelines/quality-guidelines/guidelines/supportive-care-and-treatment-related-issues
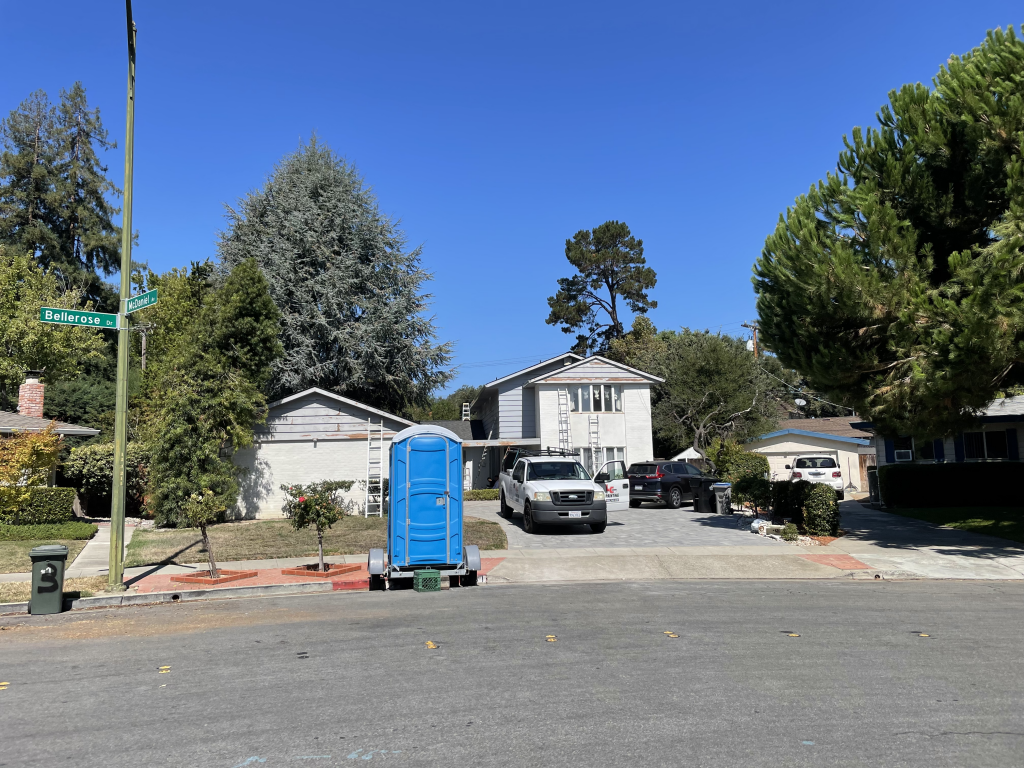
Redoing the driveway

As we worked to fix the sewer, we needed to dig out a portion of the driveway for access. And we realized that there was some sort of leak in an irrigation pipe that went under the driveway. So it became evident that redoing the entire driveway made the most sense. And pavers won out over concrete in part because we could take out a section if necessary in the future without digging everything out.
After talking to a variety of folks for recommendations, getting bids, we opted to go with Saratoga Pavers. They had the paver we wanted to use in the color we wanted, and they had a nice gap in their schedule so we didn’t have a hole in the driveway for too long.
Three videos, condensing 9 hours of work each day into about 1 minute, provide a visual of the process. Then we had to wait 2 days before we could drive on it, to let the sealant cure.
Everything you didn’t want to know about sewers…
We planned mom’s memorial reception a couple of days after her birthday, in October. I was at the ASA meeting in San Diego, when I got a call from a friend about a problem at mom’s… the toilet had backed up as had the bathrub, and it was “raining” in the furnace room in the basement.

We got the plumbers (from Rayne) to clean things out, and add a new clean-out just in front of the house. It took a few days, much of which was just dealing with the office staff to get information about when the crew were coming to work.


Things were much better… and then it happened again. We realized that the pipes in the basement/furnace room needed to be replaced. So our regular plumber, Dan, did that in early January. Just in time, as the pipes practically fell apart as they were removed.

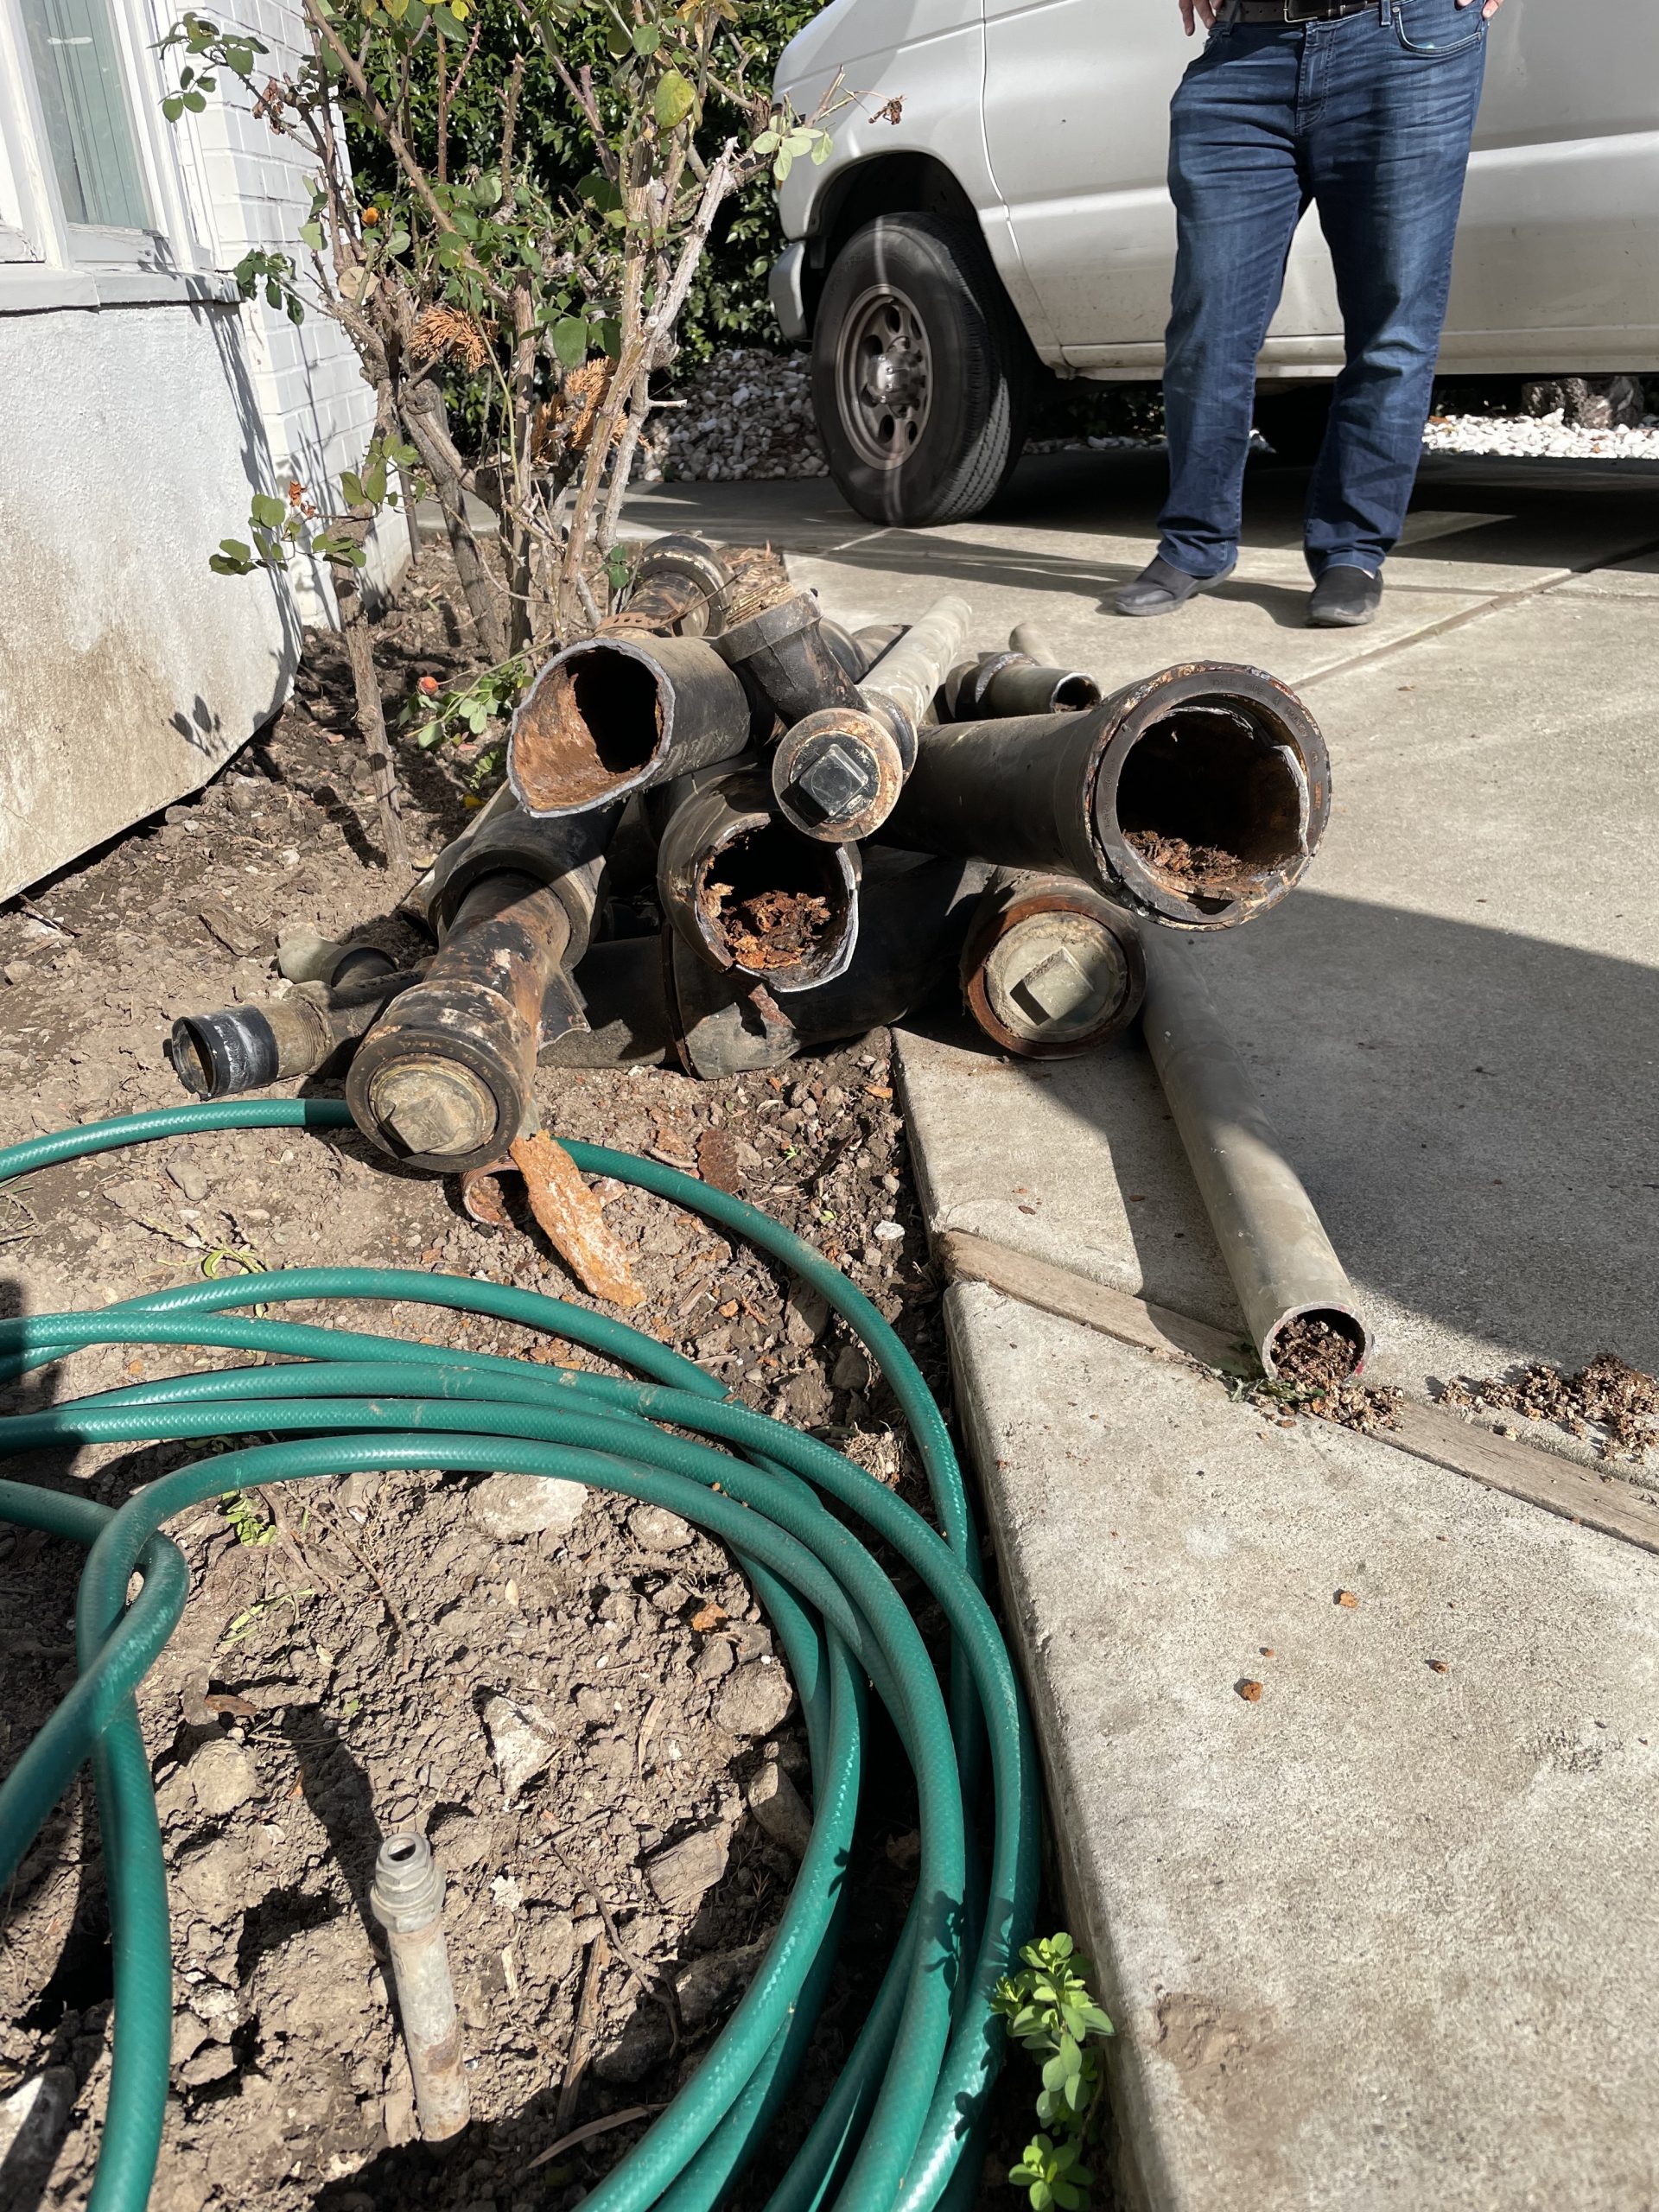
And then it happened a third time, while we were once again out of town. The guy from Rayne said that we should ‘scope the line — which we had asked them to do back in October. They showed up early, so we couldn’t see what they saw. We had to call repeatedly to get both the video and the bill. But once we had it, we could see that there were areas where the pipe was no longer straight. It could be what’s called a belly, where there is essentially a bend in the pipe, or what’s called channeling, where the bottom of the pipe is eroded away. In either case, you need to do significant work to fix it.
We weren’t sure if we would have to trench the entire line (60′ under the concrete) or could use one of the various techniques that put a new pipe down through the old one and “burst it” from the inside to keep the necessary size. Dan recommended we work with Crown Plumbing.
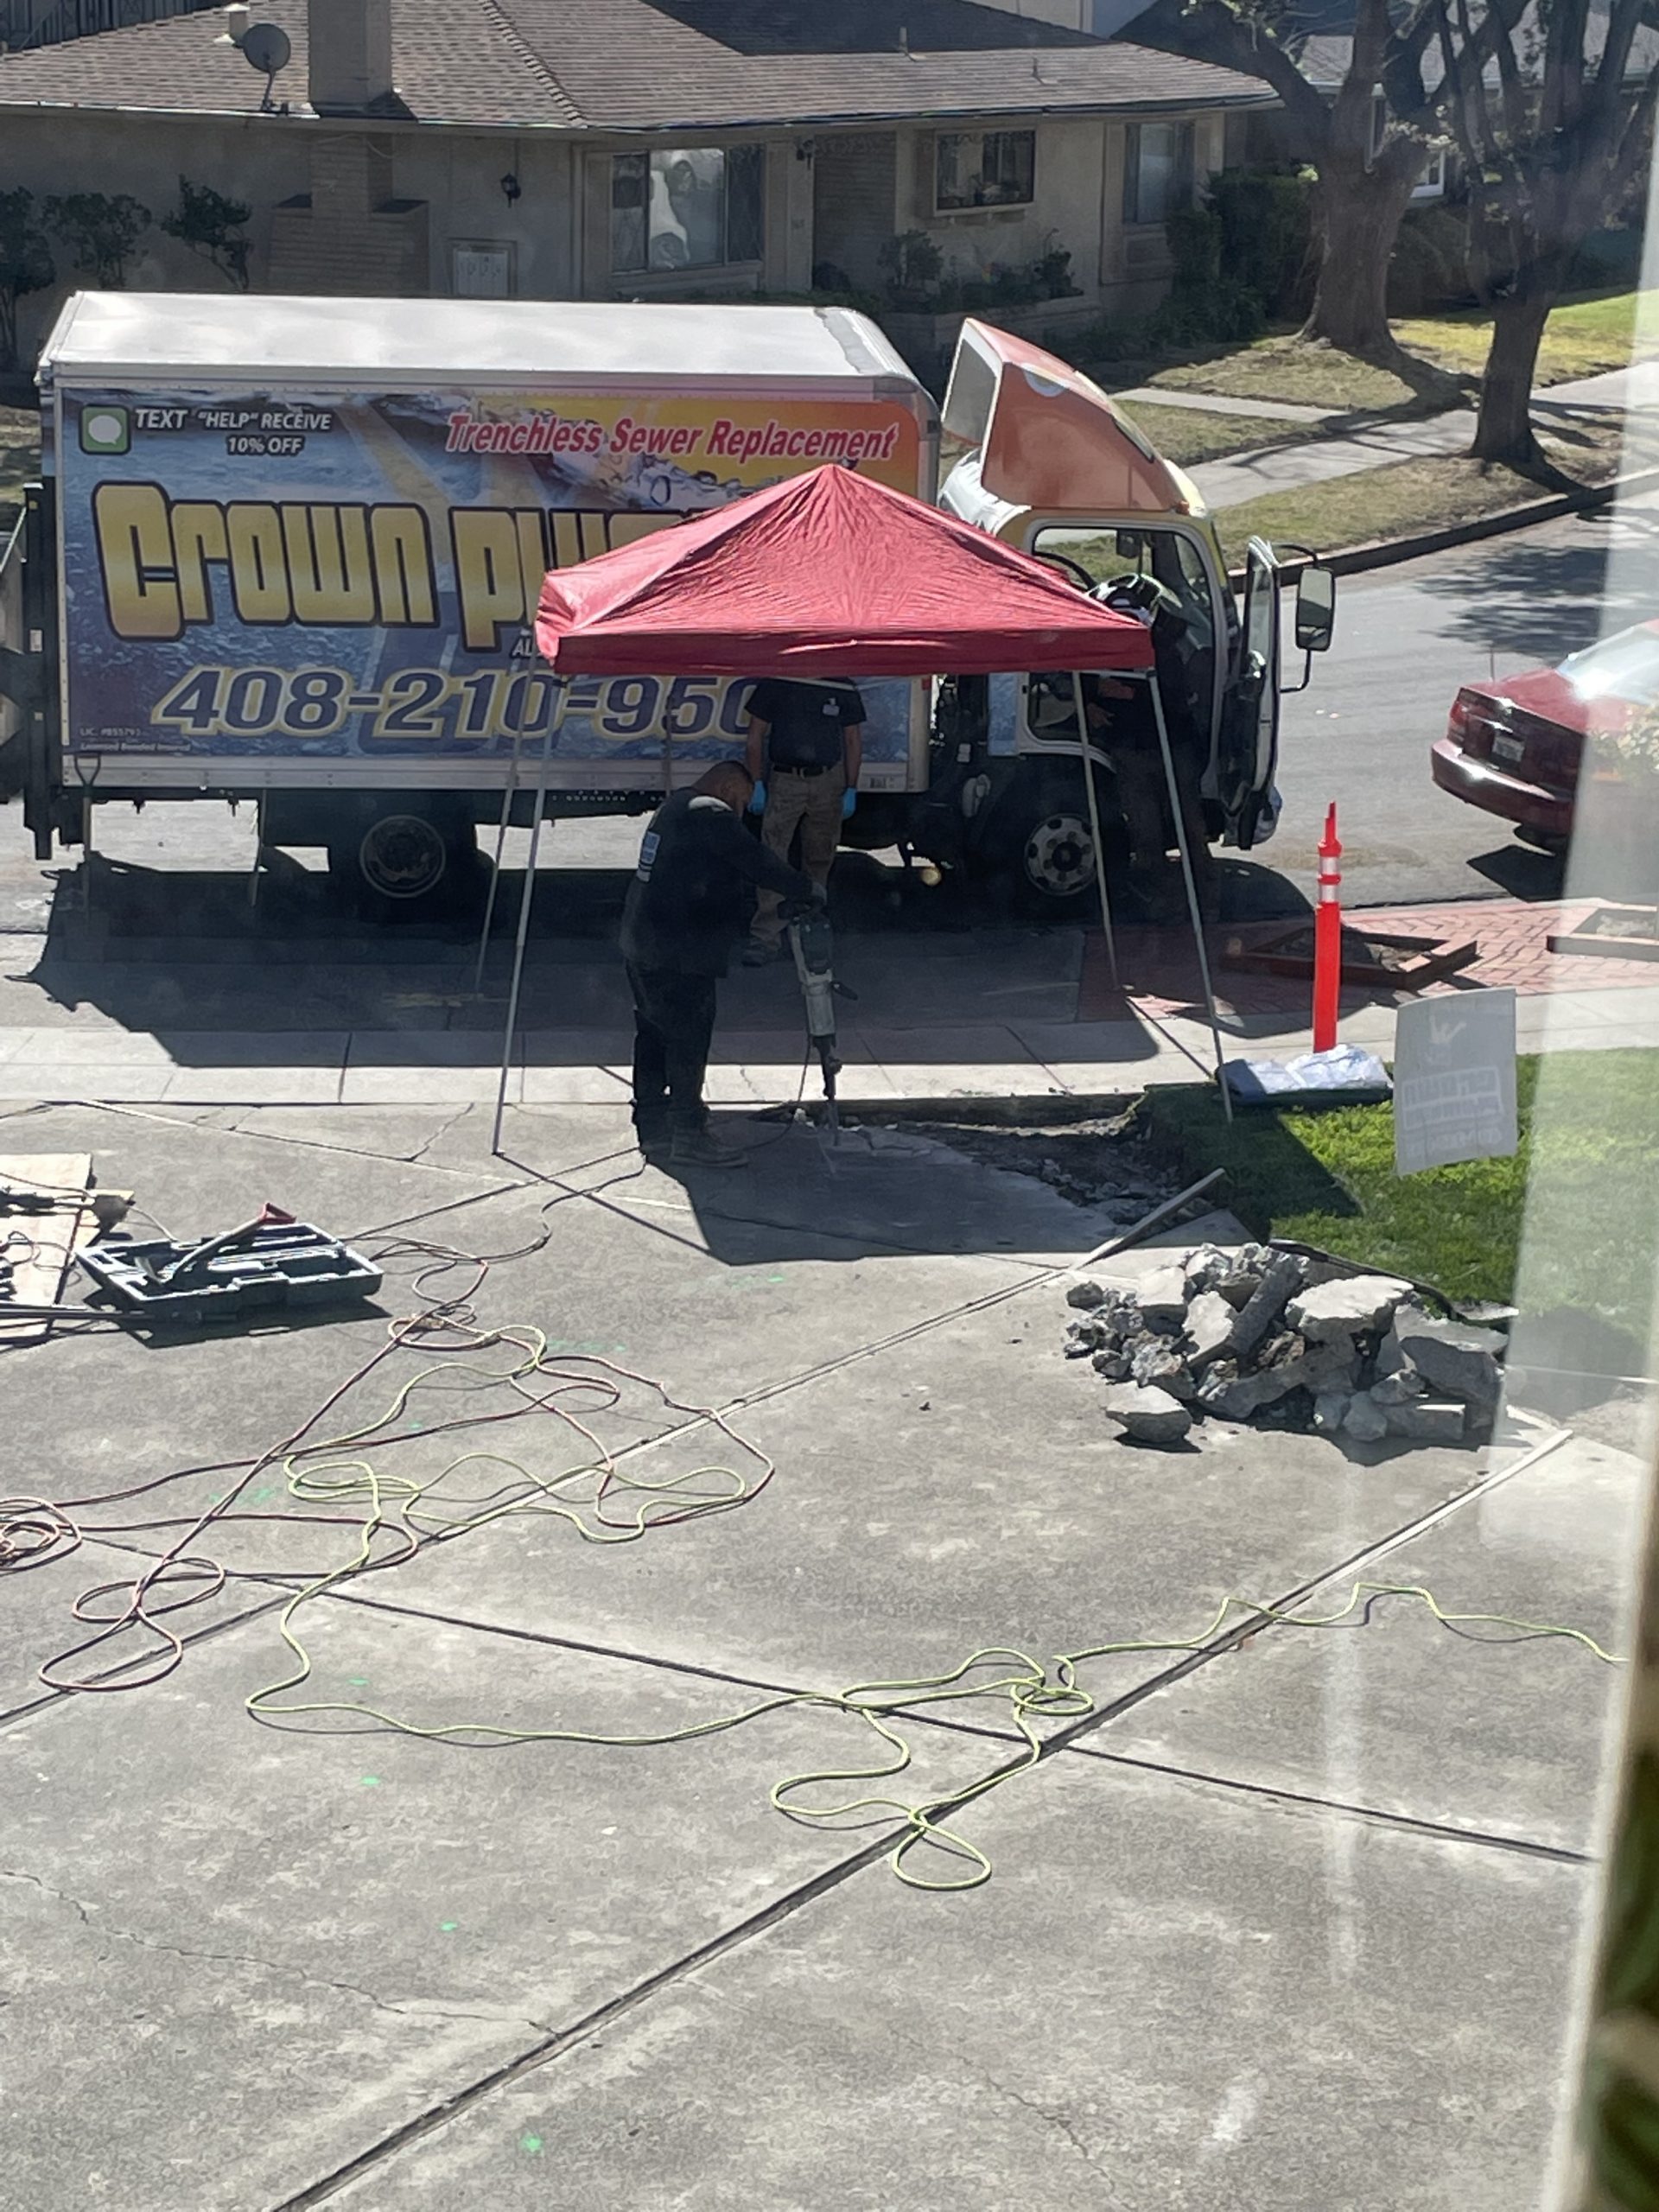
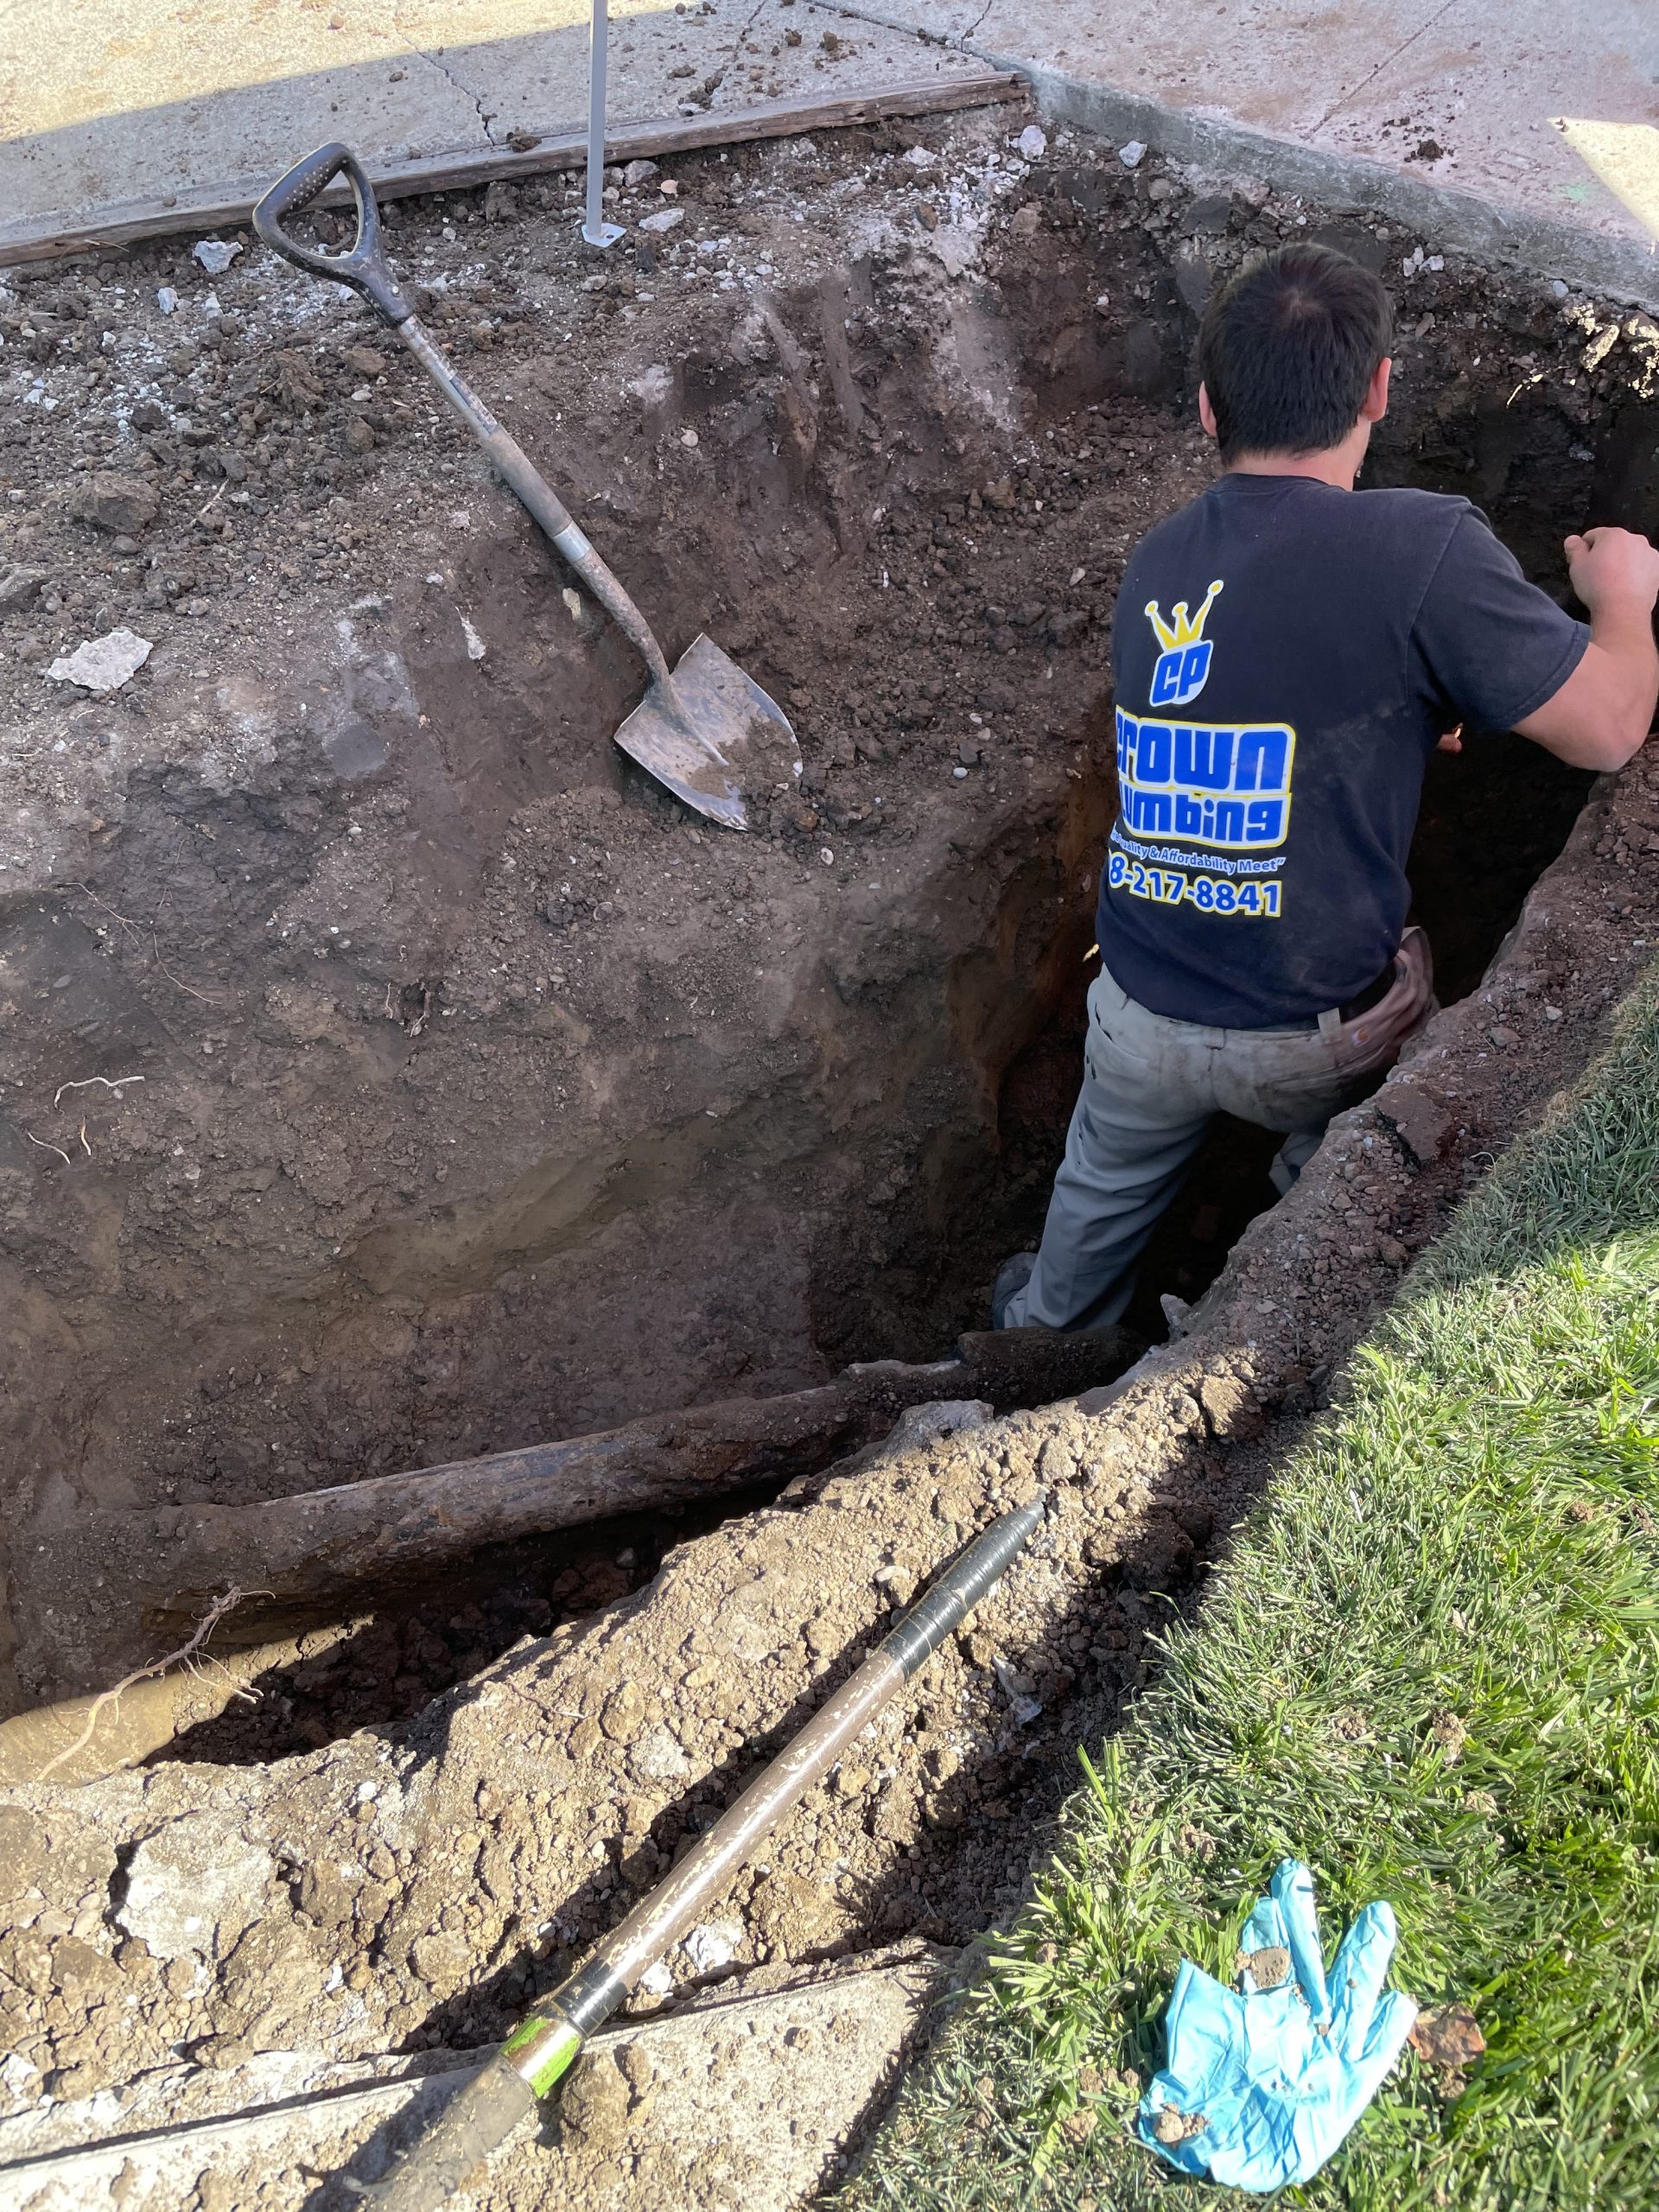


It took them a full day to dig everything out enough to be able to do the work. Crown came back a couple of days later to finish things off. They have a cool device that helps to pull the new pipe down through the old and then “burst” the old pipe so that the new is the same size as the original. I can’t explain more than that – but it’s sort of like what we do when we put in stents in arteries. That process took only about 3 hours. We tested, no leaks, so we are good to use all the plumbing fixtures in the house. Of course, we still have to wait for the formal inspection before we can fill in the hole again, and then will have to deal with the driveway repairs.


References for “Addressing EHR Burden” Presentation
If you’re interested in a list of references about Project Management and Addressing EHR burden on clinicians and staff, you’ve come to the right place.
As a member of the “Green Team” for the Project Management course offered by OHSU’s Department of Medical Informatics and Clinical Epidemiology (DMICE), we wanted to be able to share the complete references with folks, so here they are.
- Adler-Milstein J, Zhao W, Willard-Grace R, Knox M, Grumbach K. Electronic health records and burnout: Time spent on the electronic health record after hours and message volume associated with exhaustion but not with cynicism among primary care clinicians. Journal of the American Medical Informatics Association. 2020 Apr 1;27(4):531–8. 10.1093/jamia/ocz220
- AHRQ. Module 10. Academic Detailing as a Quality Improvement Tool [Internet]. 2013 [cited 2022 Feb 19]. Available from: https://www.ahrq.gov/ncepcr/tools/pf-handbook/mod10.html
- ANIA. The Six Domains of Burden: A Conceptual Framework to Address the Burden of Documentation in the Electronic Health Record [Internet]. American Nursing Informatics Association. 2020 [cited 2022 Feb 18]. Available from: https://www.ania.org/publications/position-statements
- Ashton M. Getting Rid of Stupid Stuff. New England Journal of Medicine. 2018 Nov 8;379(19):1789–91. https://doi.org/10.1056/NEJMp1809698
- Atasoy H, Greenwood BN, McCullough JS. The Digitization of Patient Care: A Review of the Effects of Electronic Health Records on Health Care Quality and Utilization. Annu Rev Public Health. 2019 Apr 1;40(1):487–500. http://10.1146/annurev-publhealth-040218-044206
- Avorn J. Academic Detailing: “Marketing” the Best Evidence to Clinicians. JAMA. 2017 Jan 24;317(4):361. 10.1001/jama.2016.16036
- Brooke J. SUS: A Retrospective. JUS – The Journal of Usability Studies. 2013 Feb 7;8(2):29–40. https://uxpajournal.org/sus-a-retrospective/
- Dymek C, Kim B, Melton GB, Payne TH, Singh H, Hsiao C-J. Building the evidence-base to reduce electronic health record-related clinician burden. Journal of the American Medical Informatics Association. 2021 May;28(5). https://doi.org/10.1093/jamia/ocaa238
- Ford EW, Menachemi N, Peterson LT, Huerta TR. Resistance Is Futile: But It Is Slowing the Pace of EHR Adoption Nonetheless. Journal of the American Medical Informatics Association. 2009 May 1;16(3):274–81. 10.1197/jamia.M3042
- Gettinger A, Mason TA. Final Report Delivers a Strategy to Reduce EHR Burden [Internet]. Health IT Buzz. 2020 [cited 2022 Feb 27]. Available from: https://www.healthit.gov/buzz-blog/health-it/final-report-delivers-a-strategy-to-reduce-ehr-burden
- HealthIT. Strategy on Reducing Burden Relating to the Use of Health IT and EHRs | HealthIT.gov [Internet]. 2020 [cited 2022 Feb 7]. Available from: https://www.healthit.gov/topic/usability-and-provider-burden/strategy-reducing-burden-relating-use-health-it-and-ehrs
- Hecht J. The future of electronic health records. Nature. 2019 Sep 25;573(7775):S114–6.
- IHI. Failure Modes and Effects Analysis (FMEA) Tool | IHI – Institute for Healthcare Improvement [Internet]. [cited 2022 Feb 26]. Available from: http://www.ihi.org:80/resources/Pages/Tools/FailureModesandEffectsAnalysisTool.aspx
- ISO. ISO 9241-11:2018(en), Ergonomics of human-system interaction — Part 11: Usability: Definitions and concepts [Internet]. [cited 2022 Mar 2]. Available from: https://www.iso.org/obp/ui/#iso:std:iso:9241:-11:ed-2:v1:en
- ISO 9241-210:2019 [Internet]. ISO. [cited 2022 Mar 2]. Available from: https://www.iso.org/cms/render/live/en/sites/isoorg/contents/data/standard/07/75/77520.html
- Jeffery J. Making Sense of EHR Satisfaction [Internet]. 2018 [cited 2022 Feb 28]. Available from: https://klasresearch.com/article/making-sense-of-ehr-satisfaction/453
- Landry MD, Sibbald WJ. Changing physician behavior: A review of patient safety in critical care medicine. Journal of Critical Care. 2002 Jun 1;17(2):138–45. 10.1053/jcrc.2002.33940
- Liu H-C, Zhang L-J, Ping Y-J, Wang L. Failure mode and effects analysis for proactive healthcare risk evaluation: A systematic literature review. Journal of Evaluation in Clinical Practice. 2020;26(4):1320–37. 10.1111/jep.13317
- NASA. TLX @ NASA Ames – Home [Internet]. [cited 2021 Nov 21]. Available from: https://humansystems.arc.nasa.gov/groups/tlx/
- NIST. Usability Standards [Internet]. NIST. 2021 [cited 2022 Mar 2]. Available from: https://www.nist.gov/programs-projects/usability-standards
- Reichheld FF. The One Number You Need to Grow. Harvard Business Review [Internet]. 2003 Dec 1 [cited 2022 Feb 13]; Available from: https://hbr.org/2003/12/the-one-number-you-need-to-grow
- Reichheld F, Darnell D, Burns M. Net Promoter 3.0. Harvard Business Review [Internet]. 2021 Nov 1 [cited 2022 Feb 13]; Available from: https://hbr.org/2021/11/net-promoter-3-0
- Sieja A, Markley K, Pell J, Gonzalez C, Redig B, Kneeland P, et al. Optimization Sprints: Improving Clinician Satisfaction and Teamwork by Rapidly Reducing Electronic Health Record Burden. Mayo Clinic Proceedings. 2019 May;94(5):793–802. 10.1016/j.mayocp.2018.08.036
- Tewfik G. Proactive Perioperative Risk Analysis: Use of Failure Mode and Effects Analysis (FMEA) [Internet]. Anesthesia Patient Safety Foundation. [cited 2022 Feb 27]. Available from: https://www.apsf.org/article/proactive-perioperative-risk-analysis-use-of-failure-mode-and-effects-analysis-fmea/
- United States. Health Information Technology for Economic and Clinical Health (HITECH) Act, Public Law 111-115, 123 Stat. 226, 2009.
- United States. Patient Protection and Affordable Care Act (PPACA). Public Law 111–148, 124 Stat. 119, 2010.
- User-Centered Design Basics | Usability.gov [Internet]. Department of Health and Human Services; 2017 [cited 2022 Feb 23]. Available from: https://www.usability.gov/what-and-why/user-centered-design.html
- Wachter RM. The digital doctor: hope, hype, and harm at the dawn of medicine’s computer age. New York: McGraw-Hill Education; 2017. 330 p. (Business classics).
- WHO. Burn-out an “occupational phenomenon”: International Classification of Diseases [Internet]. [cited 2022 Mar 2]. Available from: https://www.who.int/news/item/28-05-2019-burn-out-an-occupational-phenomenon-international-classification-of-diseases
Revisiting landscape irrigation
Technology has changed since we did the landscaping in 2007, particularly with the ability to control things remotely. I had to replace the controller (timer) at my mom’s when the hard-working device my dad placed well over 20 years ago finally failed. I got a Rainbird, with a WiFi option, so I can see what’s going on at her house. I wanted to do the same thing at our house, both for the WiFi option and because I’d never particularly liked the Rainmaster controller that was put in originally.
I did some research to figure out which model Rainbird I should get, but couldn’t find anyone who would take out the old and install the new. Fortunately, our original irrigation expert came back to San Jose for a big job this spring, and was willing to do the work between his other obligations.

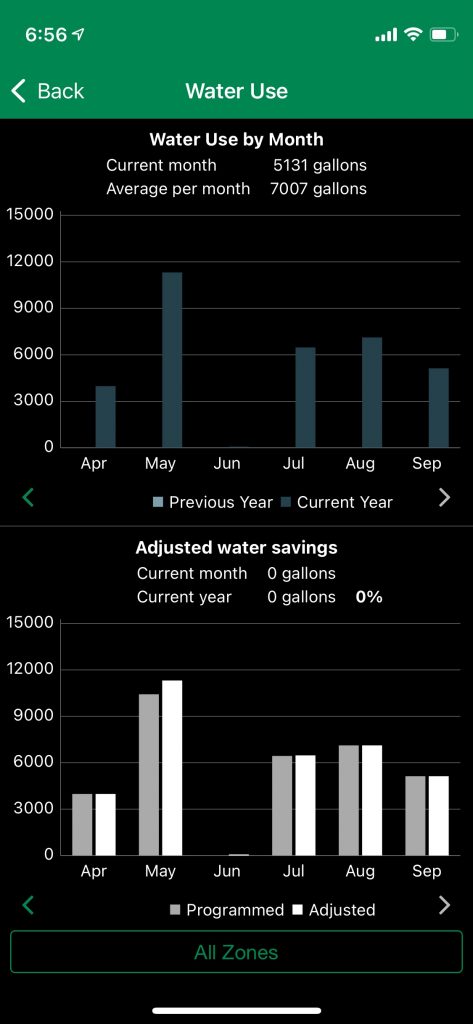
We selected the Rainbird ESP-ME3 series, with the LNK WiFi module, and added a rain sensor. We also added a flow sensor, which can help us determine if a circuit doesn’t shut off, has a leak, etc. After some initial issues with the flow sensor, we got it all settled so that we can track water usage, really important with the current drought. We also put in a “normally off” Master Valve, which will shut off the water when the sprinklers aren’t running, and prevent leaks.
Of course, now I will probably redo mom’s setup so that we can track water usage the same way, not just adjust the programming, etc.
*See also the post Drip Irrigation conversion from 2015.
Upgrading a ceiling fan – DIY is never that simple

When we first bought the house, we installed a ceiling fan in the kitchen. That fan ended up in my office, and has been really great… but it finally stopped working. Newer devices have options for remote controls, integrate with smart home technology, etc, so it was worth the upgrade.
Step 1: Figure out how to disassemble the existing fan and take it down. Of course, we first put it together and hung it up nearly 20 years ago, so we don’t have the manual any more. Total time: 90 minutes.

Step 2-A: Swear at the manufacturer who provides you with 3″ long screws, but doesn’t also provide you with the appropriate size and length drill bit*. Regular drill bits in the 9/64″ size are about 2″ long… which potentially leaves you driving in a full inch of that screw by hand (because a drill driver will just strip the head). All done while on a ladder, and working over your head. We tried, but couldn’t get that last half inch screwed into the joist. Take out the first screw before you totally mess up the Philips head. Use the second screw. Do the same. Decide it’s time to quit for the day, while leaving off the circuit breaker.
Step 2-B: go to Home Depot to get the special 12″ long drill bit, and more screws.
Step 2-C: Bend one screw. Remove it. Break one screw. Shift the bracket location and drill a new pilot hole.
Step 2-D: Return to Home Depot, get more screws. Also get a nifty ratchet screwdriver. Hope that I don’t get blisters on my palm from all of this.
Step 2-E: Finally get the mounting bracket installed. Total time for this first part (not counting dinner and sleep): 6 hours.

Typical drill bits vs provided screw 
12″ long special drill bit 
The ones who failed
Step 3: Connect the wiring, mount the central unit. It’s heavy, and plan on two people just to get it onto the posts. Everything else is a one-person job. Mounting the blades is a bit fussy, because the alignment is tricky to see when you’re working above your head. Mount the light brackets, light (LED) and glass cover. Total time: 1 hour. Turn on the circuit breaker, turn on the switch, and viola! New fan works like a dream.

Step 4: Setup the app. SIMPLEconnect is not simple. Apparently, many items in the Internet of Things (IOT) only work with 2.4GHz wifi networks. Your phone (or tablet) needs to be using that network for the setup to be completed. Of course, most of our phones nowadays use the 5GHz networks, so the two won’t talk so you can do the setup. You will get an error saying it’s Unable to Pair, and you have “Inadequate Permission” — which of course doesn’t actually tell you what’s wrong.
We had to rename most of our household network to isolate one device that we could force to stay on 2.4GHz, then “forget” the normal network and then rejoin the network, and then we could set up the app. Once it’s setup, however, you can shift everything back to normal.
See also this article: https://pocketables.com/2018/05/how-to-set-up-that-2-4ghz-device-on-your-dual-ghz-network.html
*See also this post: https://www.monty-doyle.com/?p=1240
Jean Monty Doyle
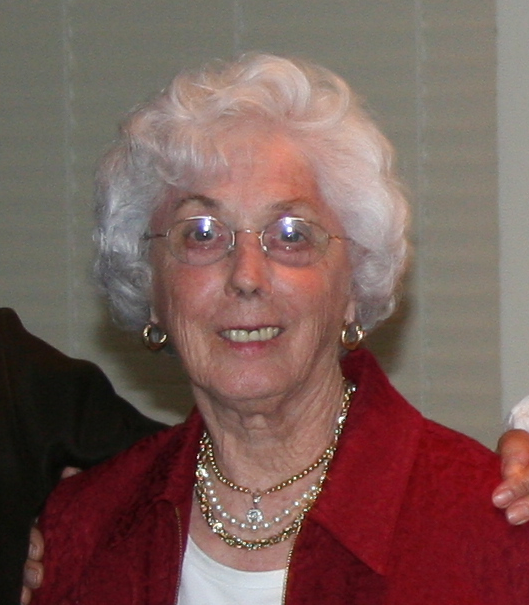
Jean Monty Doyle, age 96, passed away at her home on March 14, 2021. The youngest of six children, she was born in Omaha, Nebraska. The family moved to San Jose when she was three years old, and Jean considered herself a native Californian. Jean was an organizer, a planner, a manager, and a problem solver. She would graciously help you with as much or as little as you needed to solve your problem.
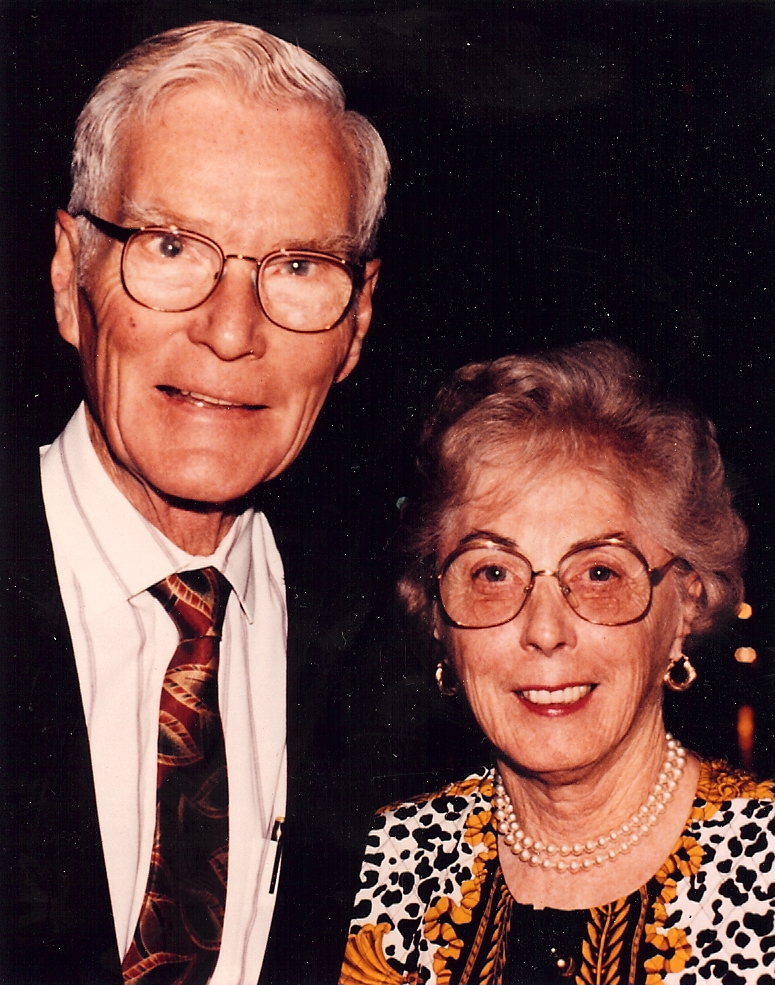
Jean wore many hats over the years. She was a registered medical record administrator and graduate of San Jose State University. Early in her career, she worked at San Jose Hospital Medical Center, in medical records, as well as the surgery and pathology departments. She also helped her brother, Dr. A.J. Monty, start the Santa Clara County Heart Association. At the request of the Santa Clara County Medical Society, she started the first medical personnel agency and medical secretarial service in San Jose. This led to her meeting her future husband David when she visited to enquire if he needed office help.
She later started a hospital transcription service and medical office consulting business, including establishing and managing a billing office for a group of physicians. New physicians contacted her and asked for help in starting their practices, including some of the first Vietnamese physicians in San Jose.
As part of her transcription service, she also wrote several handbooks which were published and used nationally. Her handbooks include “The Complete Handbook for Medical Secretaries and Assistants”, co-authored with Dr. Robert Lee Dennis, which got this rave review from Annals of Internal Medicine: “Retrieving this compendium from my secretarial-nurse staff evoked the response one might expect from Mama Bear when caught stealing one of her cubs.”
She was always extremely organized, and managed to have a successful career, run a busy household, and have an active social life. Her favorite pastimes were golf, ballroom dancing, and reading. She and her husband David traveled to many countries, and spent many happy hours dancing in each country that they visited, as well as at home.
Jean and David were very active volunteers with their daughter Christine’s Catholic schools. Jean organized student medical records for the schools to ensure everyone had gotten their childhood immunizations, in addition to providing help wherever needed. She and her husband became good and long-lasting friends with many of the high school band parents, who were ultimately dubbed “The Green Spaghetti Gang” after the fundraising spaghetti dinners. They chaperoned many of the high school band trips and had many a reunion dinner after all of their children had graduated.
In her retirement, she was a HICAP counselor for 16 years, helping seniors with their Medicare insurance questions and problems. She enjoyed sharing her medical insurance knowledge with seniors seeking advice.
She is predeceased by her loving husband David B. Doyle, MD, and her brothers, sisters, and parents. She is survived by her daughter Christine A. Doyle, MD, son-in-law Stephen Nelson, and several nieces and nephews.